
Yes—rehabilitation after a shoulder dislocation should restore movement, rotator cuff strength, and fast stability reactions, but only after the joint has been reduced and medically assessed. The safest plan is criterion-based: protect the healing tissues first, regain controlled motion, build strength, then rehearse the demands of work, gym, or sport without forcing a vulnerable position.
Start with medical assessment and an individual plan
A shoulder dislocation is not a “put it back and exercise” injury. Reduction should be performed by a trained clinician, followed by checks for fracture, nerve or blood-vessel injury, tendon damage, and the direction of instability.
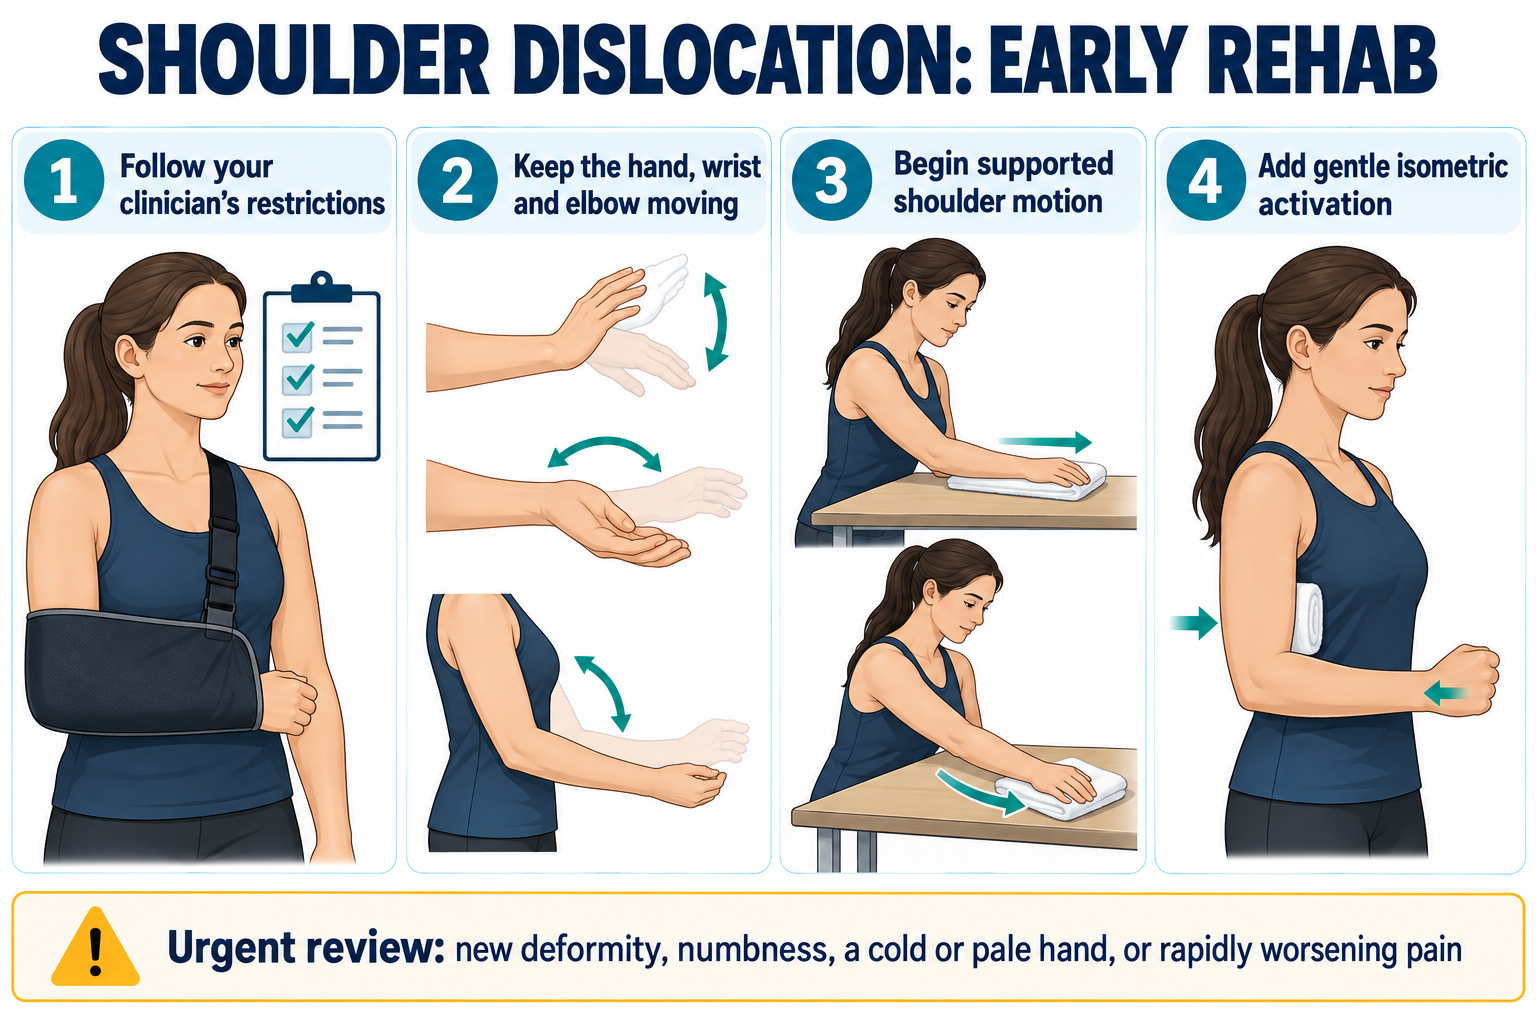
- Follow the sling instructions and movement limits given after reduction.
- Attend arranged fracture-clinic, orthopedic, sports-medicine, or physiotherapy follow-up.
- Clarify whether imaging showed a fracture or significant bone injury.
- Ask whether the episode was anterior, posterior, or multidirectional.
- Confirm whether surgery, recurrent instability, or another injury changes the plan.
The AAOS shoulder dislocation guidance explains why rehabilitation progresses from gentle muscle activation toward motion and later resistance. A generic program cannot override restrictions for a fracture, surgical repair, or neurovascular injury.
Recognize warning signs before exercising
New deformity or a shoulder that appears out of place needs urgent medical assessment; do not attempt to reduce it yourself. A cold, pale, blue, or increasingly numb hand can signal a blood-vessel or nerve problem and also requires urgent review.
- A new visible change in shoulder shape after a slip, pull, or exercise
- Rapidly increasing pain, swelling, or bruising
- New or worsening numbness, tingling, or loss of hand control
- A weak pulse, unusual hand color, or a cold hand
- Fever, redness, wound drainage, or feeling systemically unwell
Contact the treating service promptly if ordinary exercises repeatedly create a slipping sensation, sudden dead-arm feeling, marked weakness, or pain that does not settle after stopping. These findings need reassessment rather than more forceful exercise.
Use protection without allowing avoidable stiffness
A sling may protect the shoulder and improve comfort, but the type and duration depend on the injury and clinician’s plan. Remove it only as instructed for hygiene and permitted exercises, and keep the neck, hand, wrist, and elbow moving unless another injury prevents this.
- Open and close the hand and move the wrist gently.
- Bend and straighten the elbow with the upper arm supported.
- Change posture regularly instead of holding the shoulder rigid.
- Support the arm with pillows when sitting or sleeping if that is comfortable.
- Avoid lifting, pulling, pushing, or sudden reaching until cleared.
For a typical anterior dislocation, the combined position of the arm out to the side and rotated backward can feel vulnerable early on. Do not repeatedly test that position or push through apprehension; use the specific movement boundaries given by your clinician.
Restore supported motion with control
Begin shoulder motion when the treating clinician permits it. Support reduces the effort and lets you practice a smooth path without hiking the shoulder toward the ear or guarding the entire upper body.
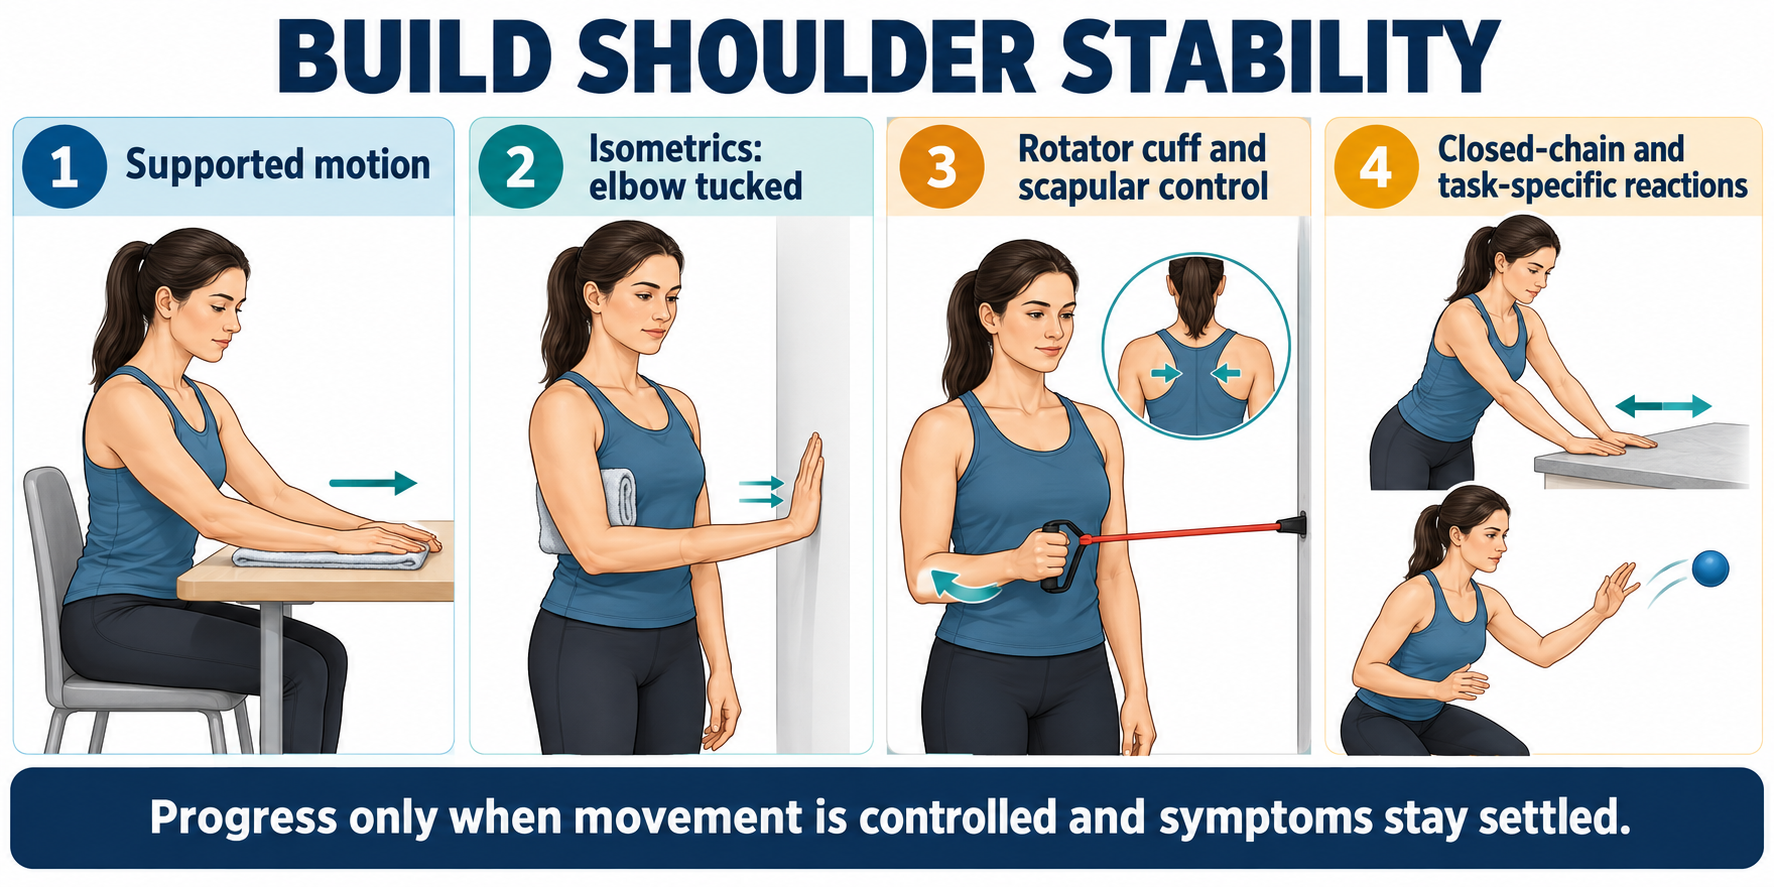
- Table slide: rest the hands or forearms on a towel and slide forward only as far as comfortable.
- Assisted forward raise: use the other hand or a stick to help the affected arm within the allowed range.
- Pendulum: support the body with the other arm and create a small, relaxed sway from the hips.
- Scapular control: gently find an upright shoulder-blade position without forceful pinching.
- External rotation: perform only within the limit specifically allowed after the injury.
The official Leeds Teaching Hospitals guidance for anterior dislocation without bony injury illustrates supported table slides, wall slides, and controlled weight transfer. Its exercises apply only when the diagnosis and restrictions match.
Add low-load isometric activation
An isometric contraction produces force without visible shoulder movement. It can reintroduce rotator cuff and deltoid activity while the elbow remains tucked by the side and the shoulder stays away from a vulnerable end position.
- Place a folded towel between the upper arm and the trunk.
- For external rotation, press the back of the hand gently outward into a wall or the other hand.
- For internal rotation, press the palm gently inward without twisting the body.
- Add gentle forward, backward, and side pressure only if permitted.
- Use a submaximal effort that does not produce slipping, sharp pain, or breath-holding.
Hold quality matters more than force. If the neck tightens, the elbow drifts away, or the shoulder rolls forward, reduce the effort and reset the position.
Build rotator cuff and shoulder-blade strength
When motion is improving and isometrics are comfortable, progress to light resistance through a controlled range. The rotator cuff helps center the ball in the socket, while shoulder-blade muscles provide a stable base for arm movement.
- Band external rotation with the upper arm resting against the trunk
- Band internal rotation through a comfortable range
- Low row with the ribs and neck relaxed
- Wall slide with gentle pressure into the wall
- Supported scaption in the shoulder-blade plane when cleared
Begin with resistance that allows smooth repetitions without trunk rotation or shoulder shrugging. Add resistance, range, repetitions, or speed one variable at a time.
Train closed-chain control and joint position
Closed-chain exercises keep the hand supported on a wall, table, or floor. They provide predictable feedback and let the shoulder learn to accept load before faster or less predictable tasks.
- Wall lean with gentle forward and backward weight shift
- Side-to-side weight shift at a countertop
- Small wall circles with a towel or light ball
- Four-point rocking only after wall and table versions are controlled
- Alternating hand taps from a stable incline position
Keep the shoulder blade controlled against the rib cage rather than collapsing or winging. Increase the body angle and load gradually, and avoid fatigue that causes the joint to feel loose or uncontrolled.
Progress reactive and task-specific stability
Daily life and sport rarely apply force in a perfectly predictable direction. Later rehabilitation should teach the shoulder to respond to small, safe disturbances before returning to heavier lifting, falls risk, contact, serving, throwing, or overhead work.
- Light rhythmic taps to the forearm while holding a stable position
- Ball rolls or gentle rebounds against a wall
- Carry variations with the arm in a comfortable position
- Work-tool or gym-pattern rehearsal with reduced load and speed
- Sport drills that progress from planned to reactive movement
The progression should match the original injury and the person’s goals. Someone returning to desk work needs different endurance and confidence than a climber, goalkeeper, swimmer, or overhead tradesperson.
Use clear progression and symptom rules
Time since injury is useful context, but it should not be the only reason to advance. Progress when the current exercise is controlled, permitted range is improving, and the shoulder remains settled during the session and afterward.
- Continue: movement is smooth, pain is mild and stable, and function is unchanged the next day.
- Modify: the shoulder hikes, the trunk compensates, or symptoms build with each set.
- Step back: pain disrupts sleep, daily function declines, or apprehension increases afterward.
- Stop and reassess: there is a slip, clunk with loss of control, neurological symptom, or new deformity.
A useful rehabilitation table is below. The stages overlap, and the treating clinician may delay or omit an exercise when another injury is present.
| Stage | Main goal | Exercise examples | Sign to progress |
|---|---|---|---|
| Protection | Settle pain and protect healing tissue | Hand, wrist, elbow motion; supported posture | Symptoms stable and restrictions understood |
| Supported motion | Restore a smooth permitted range | Table slide, assisted raise, small pendulum | Less guarding and no instability sensation |
| Activation | Recruit cuff and shoulder-blade muscles | Elbow-tucked isometrics, low row | Steady effort without compensation |
| Strength and control | Build capacity through larger ranges | Band rotation, wall slide, weight shift | Controlled repetitions and stable next-day response |
| Task preparation | Tolerate speed, load, and uncertainty | Carries, rebounds, work or sport drills | Confidence and control under goal-specific demand |
Return to work, gym, and sport by criteria
Return is safer when it reflects what the shoulder can do rather than a date alone. A clinician may compare motion, strength, endurance, power, joint-position control, apprehension, and task performance with the uninjured side and the demands of the activity.
- Comfortable movement through the range required by the task
- Strength and endurance appropriate for the load and repetition
- No slipping sensation during planned or reactive drills
- Ability to decelerate and control the arm, not only lift it
- Confidence in the previously vulnerable position
- Medical or rehabilitation clearance where the activity requires it
The AAOS chronic shoulder instability guidance notes that rehabilitation expands gradually as motion and strength return. Repeated dislocations, persistent apprehension, or a shoulder that regularly gives way deserve orthopedic reassessment.
Conclusion
Post-shoulder dislocation rehabilitation begins after reduction and medical assessment, follows the individual protection plan, and then progresses from supported motion to activation, strength, closed-chain control, and task-specific reactions. Do not force range or repeatedly test instability; advance when movement is controlled, symptoms remain settled, and the shoulder meets the real demands of daily life, work, gym, or sport.
Frequently asked questions
When can I start exercises after a shoulder dislocation?
Hand, wrist, and elbow movement may begin early when no other injury prevents it, but shoulder exercises and range limits should follow the post-reduction plan. Fracture, surgery, nerve injury, and dislocation direction can all change the timing.
How long should I wear a sling?
There is no single duration for everyone. Use the sling for the purpose and period prescribed by the treating clinician, and ask when to remove it for hygiene, sleep, and exercises rather than extending or shortening use on your own.
Which shoulder position is most vulnerable?
After a common anterior dislocation, the combined position of the arm out to the side and rotated backward may feel vulnerable, especially early on. Posterior and other instability patterns have different concerns, so follow the diagnosed direction and restrictions.
Are pendulum exercises always appropriate?
Pendulums are often used for gentle, relaxed movement, but they are not mandatory and should stay small and comfortable. Stop if they create a pulling, slipping, or escalating pain sensation, and confirm that they fit your plan.
Should stability exercises be painful?
Mild muscular effort or discomfort may occur, but sharp pain, growing apprehension, a slipping sensation, new tingling, or worsening function afterward are not useful training targets. Reduce the range or load and seek advice if symptoms persist.
Why train the rotator cuff after dislocation?
The rotator cuff contributes to centering and controlling the humeral head while the arm moves. It works with the shoulder-blade muscles and nervous system, so a complete program trains coordination and reactions as well as isolated strength.
Can I do resistance-band exercises at home?
Yes, once band work is permitted and the starting position is controlled. Begin with the elbow tucked, low resistance, and smooth movement; avoid turning the trunk or increasing range simply to stretch the band farther.
When can I return to overhead lifting?
Overhead loading is usually reintroduced after permitted range, cuff strength, scapular control, and confidence have improved. The starting load and speed should be well below the eventual demand, with progression based on the same-day and next-day response.
What if the shoulder still feels unstable?
Persistent slipping, repeated subluxation, recurrent dislocation, or strong apprehension deserves reassessment. The clinician may review the diagnosis, imaging, rehabilitation dose, bone or soft-tissue injury, and whether surgical consultation is appropriate.
Can rehabilitation prevent another dislocation?
Rehabilitation can improve strength, coordination, confidence, and the shoulder’s ability to manage load, but it cannot guarantee that another dislocation will never occur. Recurrence risk also depends on age, injury pattern, tissue or bone damage, activity, and previous instability.