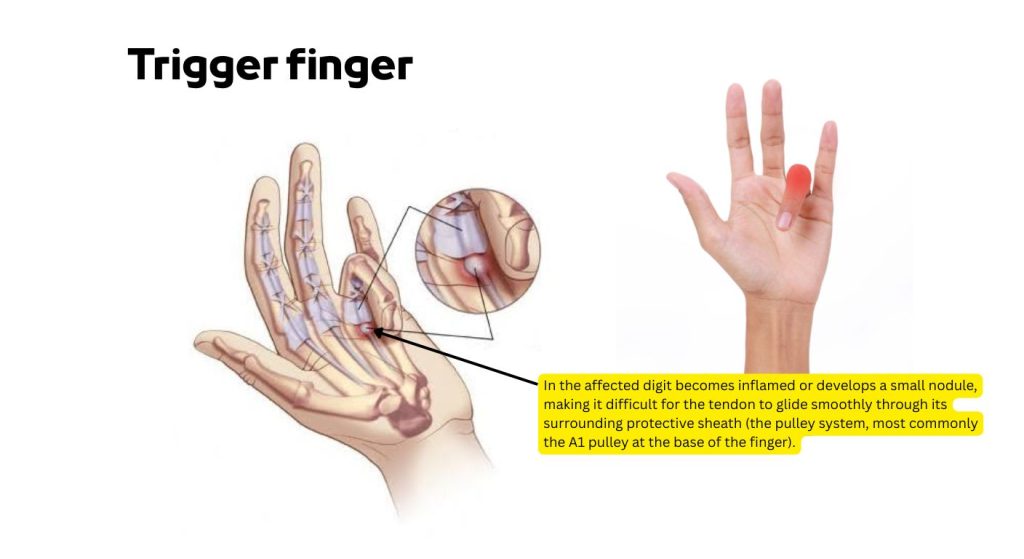
Trigger finger, clinically known as stenosing tenosynovitis, is a condition where a finger or thumb catches or locks when bent. It occurs when the flexor tendon in the affected digit becomes inflamed or develops a small nodule, making it difficult for the tendon to glide smoothly through its surrounding protective sheath (the pulley system, most commonly the A1 pulley at the base of the finger).
Trigger finger Causes and Risk Factors
- Repetitive gripping or strain
- Medical conditions
- Anatomical factors
Repetitive gripping or strain
The primary mechanical driver of trigger finger is the friction generated when a flexor tendon repeatedly rubs against its surrounding pulley sheath (specifically the A1 pulley at the palm-base of the digit).
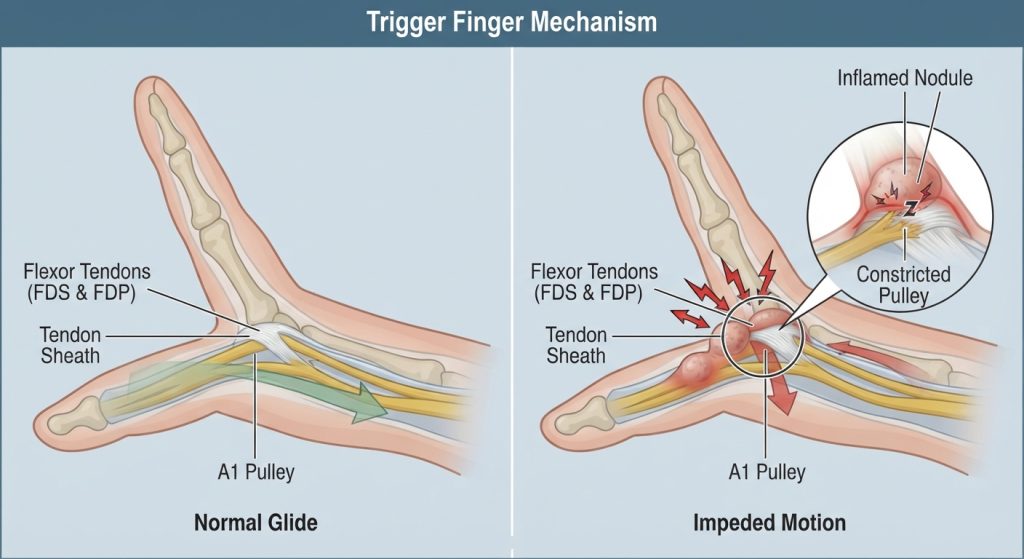
When you perform frequent, high-force gripping, use vibrating machinery, or squeeze tools for extended periods, microtrauma occurs within the tendon and the inner lining of the tendon sheath.
This friction triggers a local inflammatory response, causing the tendon to swell or develop a localized fibrous nodule. Once this nodule becomes too bulky to pass smoothly through the tight pulley tunnel during finger flexion and extension, it catches or locks, perpetuating a cycle of irritation every time the digit moves.
Medical conditions
Systemic and metabolic disorders significantly alter the biochemical properties of connective tissue, predisposing individuals to tendon thickening and sheath entrapment.
- Diabetes Mellitus: Elevated blood glucose levels lead to non-enzymatic glycosylation of proteins, causing collagen fibers within the tendon and pulley to become stiffer, thicker, and more prone to catching. Trigger finger occurs at a substantially higher rate in diabetic patients.
- Rheumatoid Arthritis and Inflammatory Arthropathies: Chronic systemic inflammation attacks the synovial tissues surrounding joints and tendons (tenosynovitis), leading to proliferative thickening of the flexor tendon sheath and restricted gliding space.
- Hypothyroidism: An underactive thyroid slows down metabolic processes and can cause a deposition of mucopolysaccharides in soft tissues, resulting in myxedematous thickening of the flexor tendons and nerve entrapments like carpal tunnel syndrome, which frequently coexists with trigger finger.
Anatomical factors
Intrinsic physical and demographic characteristics can narrow the relative clearance through which the flexor tendon must travel, increasing susceptibility to impingement.
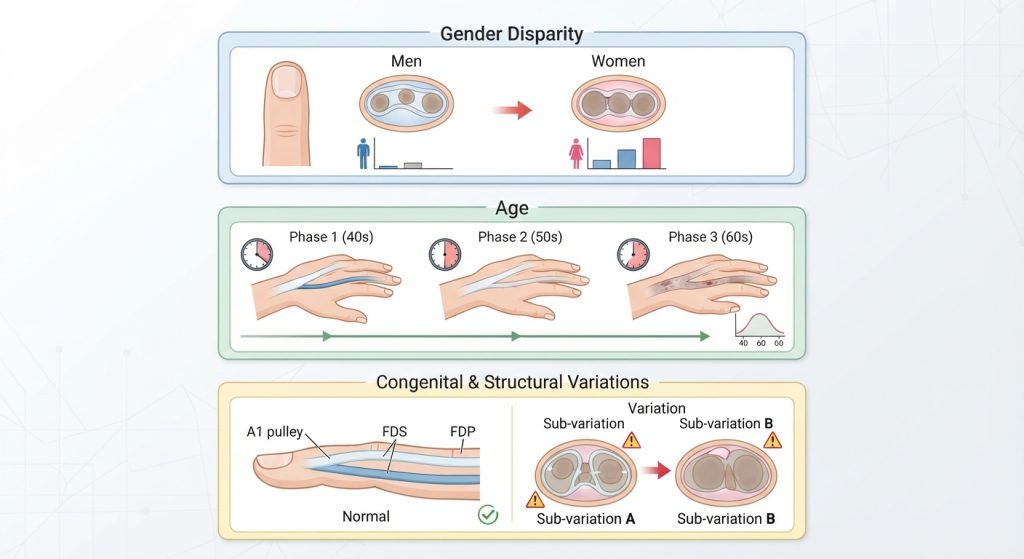
- Gender Disparity: Women are affected up to two to six times more frequently than men. This is partly attributed to anatomical differences in the cross-sectional geometry and width of the digital flexor tendon sheath relative to tendon size, as well as hormonal fluctuations associated with menopause.
- Age: The condition peaks between the ages of 40 and 60 years. Decades of cumulative mechanical wear, combined with age-related decreases in tissue elasticity and vascularity, make the tendons and pulleys less resilient to friction.
- Congenital and Structural Variations: Some individuals naturally possess a narrower A1 pulley canal or variations in the thickness of the flexor digitorum superficialis and profundus tendons, lowering the threshold for mechanical entrapment even under normal daily loads.
Trigger finger Symptoms
- Catching or clicking: A sensation of snapping or popping when moving the finger.
- Locking: The finger may catch in a bent position and suddenly snap straight, or become temporarily locked and require passive assistance to straighten.
- Tenderness: Pain or a tender nodule felt at the base of the affected finger on the palm side.
- Stiffness: Noticeable stiffness, particularly first thing in the morning.
Splinting Types, Application, and Best Options
Splinting immobilizes the metacarpophalangeal (MCP) joint to prevent the tendon from sliding back and forth through the inflamed pulley, allowing the tissue to rest and reduce swelling.
- MCP Extension Splints
- PIP Blocking Splints
- Application technique
- Best option
MCP Extension Splints
These orthoses immobilize the metacarpophalangeal (MCP) joint at the base of the finger, typically holding it in slight flexion (around 10 to 15 degrees) or near full extension. By restricting movement at this specific joint, the splint prevents the flexor tendon and its swollen nodule from sliding back and forth through the tight A1 pulley tunnel. This enforced mechanical rest allows the localized inflammation within the tendon sheath to subside without ongoing frictional irritation.
PIP Blocking Splints
Proximal interphalangeal (PIP) blocking splints restrict movement at the middle joint of the finger. While the primary entrapment in trigger finger occurs further down at the palm-base (A1 pulley), PIP blocking splints are occasionally utilized when secondary compensatory locking or snapping occurs at the middle joint. They stabilize the finger alignment, prevent excessive terminal joint snapping, and ensure the tendon excursion remains controlled during early functional tasks.
Application technique
Proper application requires positioning the affected finger correctly within a custom-molded thermoplastic or prefabricated orthosis so that the targeted joint is held securely without excessive pressure. The splint should be fastened snugly using hypoallergenic medical tape or adjustable Velcro straps to prevent slipping during movement. Care must be taken to ensure the straps are not tied too tightly, as restrictive pressure can compromise digital circulation, cause skin maceration, or impede the mobility of adjacent uninjured fingers.
Best option
A custom-molded thermoplastic MCP extension splint or a low-profile ring splint is clinically considered the best option for managing trigger finger. Unlike bulky universal splints that freeze multiple joints and hinder everyday tasks, these low-profile designs selectively block the MCP joint’s flexion while leaving the distal and proximal interphalangeal joints free, significantly improving patient compliance and allowing for light daily hand use during conservative rehabilitation.
Trigger finger Physiotherapy Role and Treatment Plan
Physiotherapists focus on reducing inflammation, restoring pain-free tendon gliding, and improving hand mechanics without immediately resorting to invasive procedures.
- Modalities and Manual Therapy: Application of localized therapeutic modalities (such as ultrasound or low-level laser therapy) to reduce inflammation, combined with gentle soft tissue mobilization around the A1 pulley and scar tissue release if chronic.
- Tendon Gliding Exercises: Active exercises moving the finger sequentially from a straight position to a hook fist, full fist, and table-top position to promote smooth excursion.
- Gentle Mobility and Stretching: Passive and active-assisted range of motion to prevent secondary joint contractures.
- Ergonomic and Activity Modification: Educating patients on reducing forceful gripping, redistributing hand pressure, and modifying daily tool use.
Conservative Treatment Plan (4 to 6 Weeks)
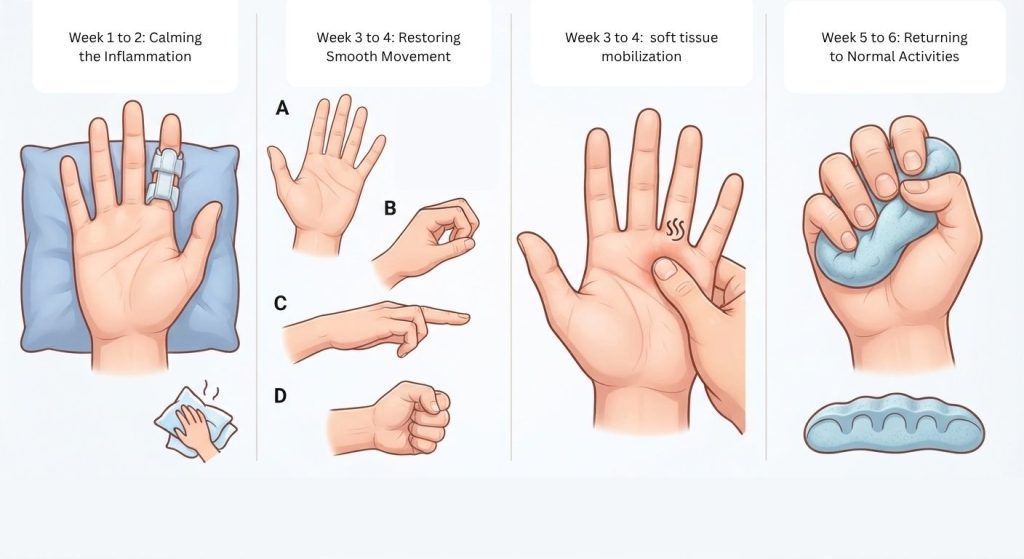
Week 1 to 2: Calming the Inflammation
- What you should do: Give your finger a break from heavy gripping and repetitive tasks. Wear your MCP extension splint primarily at night while sleeping and during tasks that usually aggravate the pain.
- Why it helps: Splinting stops the swollen part of the tendon from sliding back and forth through the tight tunnel, allowing the inflammation to settle down.
- Home care: Apply an ice pack wrapped in a thin towel to the base of your finger for 10 to 15 minutes if it feels hot or sore.
- Gentle movement: Perform very gentle passive stretches—use your other hand to slowly bend and straighten the affected finger without forcing it, keeping discomfort to a minimum.
Week 3 to 4: Restoring Smooth Movement
- What you should do: Start weaning yourself off the splint during the day as your catching and locking symptoms begin to improve.
- Tendon gliding exercises: Slowly move your hand through specific positions to help the tendon glide smoothly again:
- Start with your hand held straight out.
- Bend the middle and end joints of your fingers to make a “hook” shape.
- Straighten back out, then bend your fingers at the base knuckle to make a “table-top” flat hand.
- Finally, make a gentle, loose fist, then open back up. Repeat this sequence slowly 5 to 10 times, twice a day.
- Tissue care: Use your thumb to apply very light, circular friction massage directly over the tender spot at the base of your palm to prevent stiffness and scar tissue buildup.
Week 5 to 6: Returning to Normal Activities
- What you should do: Gradually reintroduce normal hand use, but pay close attention to how your finger responds.
- Light strengthening: If you are completely pain-free, you can introduce very light hand exercises, such as gently squeezing soft therapeutic putty or a stress ball for a few seconds at a time. Stop immediately if you feel any clicking, catching, or sharp pain.
- Ergonomic check: Review how you hold everyday objects, tools, or kitchen utensils. Avoid pinching tightly with a single finger, and look for ways to pad handles or distribute the load across your whole hand to prevent a relapse.
Trigger finger Prevention
- Take regular breaks: Pause repetitive gripping or tool use every 30 to 45 minutes to stretch and relax the hand muscles.
- Optimize grip mechanics: Use ergonomic tools with padded, wider handles to reduce localized pressure on the palm and flexor tendons.
- Avoid prolonged gripping: Distribute load across the entire hand and forearm rather than relying heavily on pinch grips or single-finger pressure.