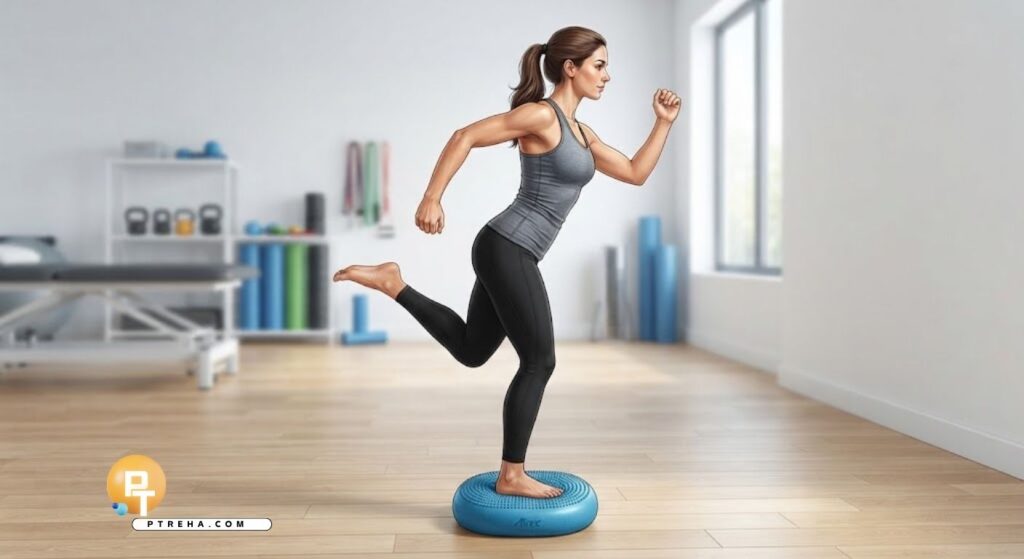
Single-leg Balance is more than simply standing on one foot.
A useful single-leg stability progression routine for ankle health gradually challenges balance, foot and ankle strength, sensory control, hip stability, and movement coordination while keeping symptoms and movement quality under control.
Why Single-Leg Stability Matters for Ankle Health
Walking, climbing stairs, running, and changing direction repeatedly place the body over one leg.
During these moments, the ankle must adapt to changes in load while the rest of the lower limb controls the position of the foot, knee, hip, and trunk.
Single-leg balance exercises are therefore commonly used in rehabilitation following lateral ankle sprains and in programs addressing recurrent ankle instability.
The APTA clinical practice guideline for ankle ligament sprains includes balance and neuromuscular exercise within evidence-based management of ankle instability.
A good balance program can train several abilities at once:
- Maintaining the center of mass over one foot.
- Responding to small changes in body position.
- Coordinating ankle, knee, hip, and trunk movements.
- Controlling the foot during reaching tasks.
- Improving confidence during single-leg loading.
- Preparing the leg for more demanding functional tasks.
Balance is not controlled by the ankle alone.
Vision, vestibular information, sensation from the foot and ankle, muscle activity, joint motion, and proximal control all contribute.
This is why ankle rehabilitation should not consist only of repeatedly trying to keep the ankle completely still.
Before Starting the Single-Leg Stability Routine
The appropriate starting level depends on the person’s symptoms, injury stage, strength, mobility, and ability to accept weight through the leg.
Someone without an acute injury may begin with basic unsupported balance.
A person recovering from an ankle sprain may initially require hand support before progressing.
Before beginning, you should generally be able to:
- Stand comfortably with weight distributed through the involved leg.
- Walk without major deterioration in gait.
- Accept body weight without sharp ankle pain.
- Maintain reasonably controlled foot positioning.
- Perform basic ankle movements without substantial symptom aggravation.
- Use nearby support when needed for safety.
Do not treat inability to perform a difficult balance exercise as proof that the ankle is structurally unstable.
Balance performance can be affected by many factors, including pain, fatigue, strength, previous injury, fear, attention, footwear, surface conditions, and neurological function.
Seek appropriate clinical assessment when there is:
- Inability to bear weight after an injury.
- Significant deformity.
- Rapid or severe swelling.
- Persistent locking or catching.
- Recurrent unexplained giving way.
- Progressive numbness or weakness.
- Significant pain that does not improve.
- A suspected fracture or significant ligament injury.
The routine below is intended as a progressive exercise framework rather than a substitute for assessment of a recent or significant ankle injury.
How to Set Up a Good Single-Leg Stance
Start on a firm, level floor beside a countertop, wall, or stable chair.
Stand on one leg while keeping the body relatively tall.
The knee may remain slightly flexed rather than rigidly locked.
Pay attention to the entire lower limb.
Useful technique cues include:
- Keep pressure distributed through the foot rather than gripping aggressively with the toes.
- Allow a small amount of knee flexion.
- Keep the kneecap generally aligned with the direction of the foot.
- Keep the pelvis relatively level.
- Avoid excessive trunk leaning.
- Look forward rather than constantly watching the foot.
- Keep a stable object within reach.
Small ankle movements are normal.
In fact, minor corrections at the ankle are part of normal postural control.
The goal is controlled balance, not a perfectly motionless foot.
A practical starting position is:
- Stand barefoot or in stable footwear.
- Hold a counter lightly if necessary.
- Lift the opposite foot a short distance from the floor.
- Maintain the position for approximately 20–30 seconds.
- Repeat two or three times.
Once this becomes comfortable and technically controlled, progress the task rather than simply holding it for increasingly long periods.
Single-Leg Stability Progression Routine
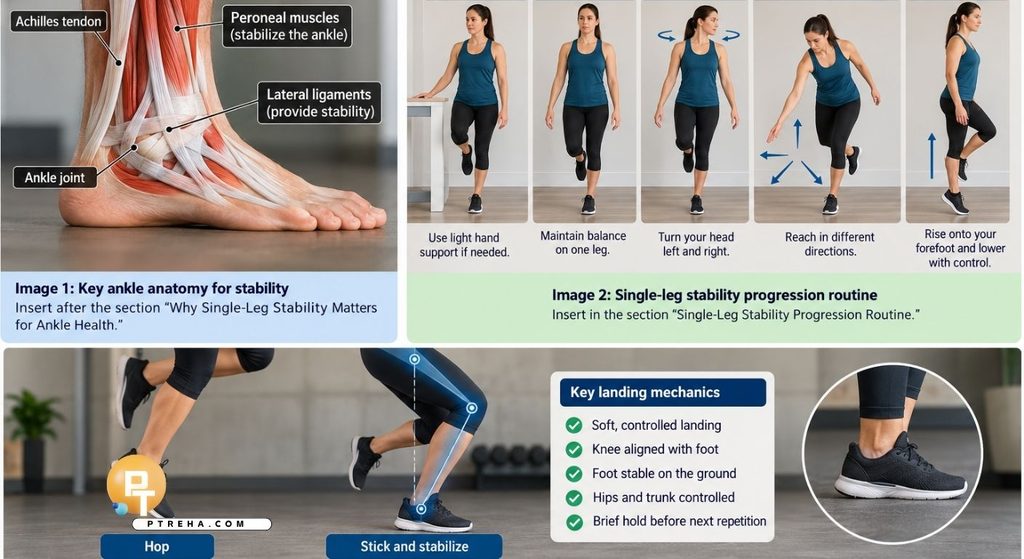
Progressive balance training works best when the challenge changes gradually.
The following sequence moves from basic static control toward more dynamic ankle demands.
| Level | Exercise | Main Challenge | Example Target |
|---|---|---|---|
| 1 | Supported single-leg stance | Basic weight acceptance | 20–30 sec |
| 2 | Unsupported single-leg stance | Static balance | 20–40 sec |
| 3 | Head turns or arm movement | Sensory/postural challenge | 20–30 sec |
| 4 | Multidirectional reaches | Dynamic control | 5–8 reaches/direction |
| 5 | Single-leg heel raise or mini squat | Strength with balance | 6–12 reps |
| 6 | Foam-surface balance | Surface instability | 15–30 sec |
| 7 | Ball toss or external task | Reactive/dual-task control | 20–40 sec |
| 8 | Hop and stick | Landing control | 4–8 controlled reps |
These numbers are practical starting ranges rather than universal rehabilitation requirements.
Exercise dosage should be adjusted according to symptoms, ability, fatigue, and treatment goals.
Level 1: Supported Single-Leg Stance
Begin beside a stable support.
Place most or all of your weight through one leg and lift the opposite foot.
Use one or two fingers on the counter as needed.
Try:
- 2–3 sets.
- 20–30 seconds per attempt.
- Both legs.
- Controlled breathing.
- Minimal hand pressure.
The important progression is reducing reliance on the hands.
Moving from two hands to one hand, then fingertips, and finally no support can provide a smooth transition.
Level 2: Unsupported Single-Leg Stance
Once hand support is no longer necessary, practice standing freely on a firm surface.
Maintain a relaxed posture instead of stiffening every muscle.
Focus on:
- Keeping the pelvis controlled.
- Avoiding repeated foot touch-downs.
- Keeping the stance knee steady.
- Limiting large trunk corrections.
- Maintaining comfortable breathing.
A common error is aggressively curling the toes into the floor.
Toe gripping may temporarily make the task feel easier, but the goal is coordinated balance involving the entire lower limb rather than excessive tension in the toes.
Level 3: Add Head, Arm, and Visual Challenges
The next progression changes the sensory or upper-body demands without dramatically increasing ankle loading.
For example, maintain single-leg stance while slowly:
- Turning the head left and right.
- Looking slightly upward and downward.
- Reaching the arms forward.
- Reaching both arms overhead.
- Moving the arms across the body.
- Passing a lightweight object between the hands.
Closing the eyes creates a substantially greater challenge because visual information is removed.
Use this progression carefully and stay beside stable support.
It is generally better to establish good eyes-open control before trying eyes-closed balance.
Avoid using eyes-closed exercises when falling would present a meaningful safety risk.
Build Dynamic Stability With Multidirectional Reaching
Static balance is useful, but everyday activities rarely involve standing completely still.
Multidirectional reaching requires the stance ankle to control the body while the opposite leg moves.
Stand on one leg and reach the opposite foot:
- Forward.
- Diagonally forward.
- Sideways.
- Diagonally backward.
- Backward.
Return to the starting position after every reach.
Keep the reaches relatively short initially.
Reach farther only when you can maintain good control.
Watch for:
- The stance knee collapsing excessively inward.
- The foot losing control.
- Sudden trunk rotation.
- Rapid loss of balance.
- Pain increasing with each repetition.
A useful variation is a clock-reach drill.
Imagine that you are standing in the center of a clock and lightly touch different points around yourself with the free foot.
This type of exercise resembles principles used in clinical dynamic balance testing.
The APTA information on the Star Excursion Balance Test explains that multidirectional reaching is used to assess dynamic postural control and is relevant to ankle rehabilitation.
A simple routine could include:
- 5 forward reaches.
- 5 diagonal reaches.
- 5 lateral reaches.
- 5 backward reaches.
- 2 rounds per leg.
Do not turn a home exercise into a formal clinical test unless you are following the standardized test procedure.
Add Ankle and Leg Strength Without Losing Balance
Balance and strength should gradually begin to overlap.
Once basic reaching is controlled, introduce movements where the ankle must stabilize while producing force.
Single-Leg Heel Raise
Stand on one leg beside support and slowly rise onto the forefoot.
Then lower under control.
Use these technique points:
- Rise vertically rather than rolling outward.
- Keep the heel reasonably controlled.
- Avoid excessive ankle wobbling.
- Lower slowly.
- Use light fingertip support when necessary.
Start with a manageable number of quality repetitions rather than performing repeated compensatory movements.
Single-Leg Mini Squat
Stand on one leg and slowly bend the hip and knee a small amount before returning upright.
Focus on:
- Keeping the foot controlled.
- Maintaining knee alignment.
- Keeping the pelvis relatively stable.
- Avoiding excessive trunk movement.
- Staying within a comfortable depth.
Other useful strength-balance combinations include:
- Step-ups with a balance hold.
- Step-downs.
- Reverse lunges to single-leg stance.
- Single-leg Romanian deadlift patterns.
- Heel raises followed by a balance hold.
These movements help shift rehabilitation from isolated balance toward functional lower-limb control.
Progress the Surface Only When Firm-Ground Balance Is Good
Foam pads and other compliant surfaces make balancing more difficult because information from the support surface becomes less consistent.
This can be useful, but unstable equipment is not automatically superior to firm-ground training.
Begin with:
- Firm floor.
- Thin exercise mat.
- Foam balance pad.
More challenging devices may be appropriate in supervised rehabilitation, but difficulty should serve a purpose.
The Mass General ankle sprain rehabilitation protocol includes progression from balance activities toward multidirectional reaching, unstable surfaces, dual-task exercises, and eventually higher-level single-leg activities.
When progressing to foam:
- Return to a simpler stance first.
- Keep a stable support nearby.
- Reduce the duration if necessary.
- Maintain quality rather than fighting through repeated loss of balance.
- Progress reaches only after static control improves.
Someone who cannot control a basic single-leg stance on the floor usually does not need a more unstable surface yet.
Add Dual-Task and Reactive Balance Exercises
Daily life often requires maintaining balance while doing something else.
You may be carrying an object, looking around, talking, catching something, or responding to an unexpected movement.
Dual-task exercises gradually introduce these demands.
Examples include:
- Tossing a ball between the hands.
- Throwing a ball against a wall.
- Catching from a partner.
- Turning the head toward different targets.
- Moving a lightweight object between shelves.
- Performing simple arm movements.
- Reaching for objects placed around the body.
External perturbations can also be introduced under appropriate supervision.
For example, a therapist may apply small, unpredictable movements while the patient maintains balance.
The goal is not to make the patient fail repeatedly.
The challenge should be large enough to require corrections while still allowing successful control.
A practical progression is:
- Stable stance with ball toss.
- Multidirectional reach plus ball movement.
- Foam stance with simple upper-body task.
- Single-leg stance with unpredictable catches.
For athletes, similar principles can eventually be incorporated into sport-specific tasks.
Progress Toward Hop-and-Stick Control When Appropriate
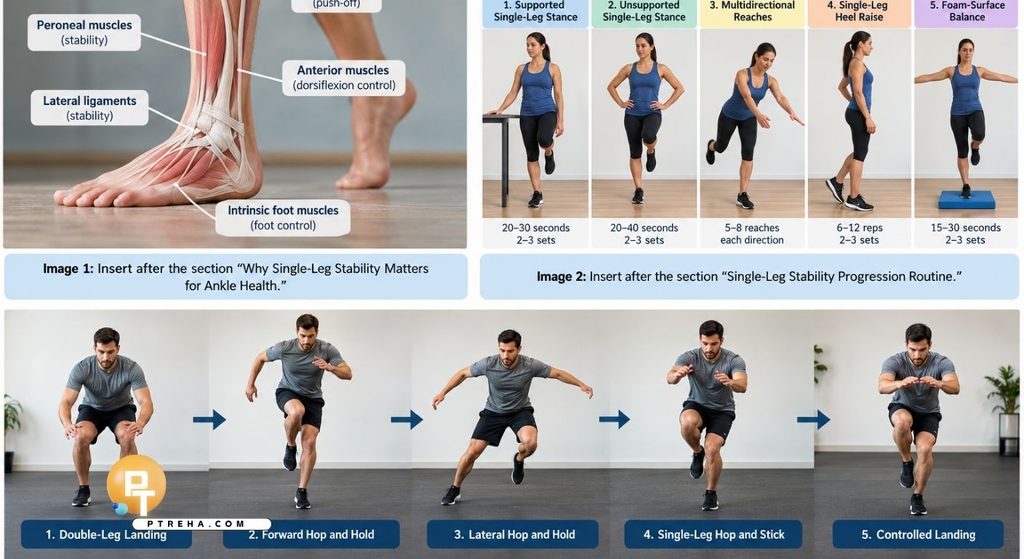
Hopping is considerably more demanding than standing balance.
A person recovering from injury should not progress to hopping simply because static balance looks good.
Adequate strength, weight-bearing tolerance, movement control, and confidence should be present first.
Begin with lower-load activities such as:
- Double-leg landing.
- Small forward hop and hold.
- Small lateral hop and hold.
- Single-leg forward hop and stabilization.
- Diagonal hop and stabilization.
After every landing, briefly establish control before the next repetition.
Look for:
- Quiet, controlled landing.
- Stable foot position.
- Appropriate knee flexion.
- Controlled knee alignment.
- Minimal unnecessary trunk movement.
- No increase in ankle pain or swelling.
The distance of the hop is secondary to landing quality during the early stages.
Later progressions can include:
- Repeated hops.
- Side-to-side hops.
- Bounding.
- Direction changes.
- Acceleration and deceleration.
- Sport-specific movement patterns.
These exercises are particularly relevant when preparing for sports involving jumping, cutting, or rapid changes in direction.
How Often Should You Train Single-Leg Stability?
There is no single dosage that is ideal for every person.
A general home program may use short sessions several times per week, while rehabilitation after injury should be adjusted to the individual’s clinical presentation.
A practical session could look like this:
- Single-leg stance: 2 sets.
- Multidirectional reach: 5 repetitions each direction.
- Single-leg heel raise: 2 sets.
- Mini squat: 2 sets.
- Ball toss balance: 2 short rounds.
- Hop-and-stick drills only when appropriate.
Quality matters more than creating a very long session.
Balance exercises also become less useful when fatigue causes repeated compensations.
Consider ending or modifying a set when:
- Balance deteriorates substantially.
- Foot position repeatedly collapses.
- The knee becomes difficult to control.
- Pain progressively increases.
- Swelling increases afterward.
- Technique can no longer be maintained.
Mild muscular effort is expected.
Sharp pain or progressive joint symptoms are not training goals.
How to Know When You Are Ready to Progress
Do not progress solely because a certain number of days have passed.
A criteria-based approach is generally more useful.
Consider increasing the challenge when you can:
- Complete the current exercise consistently.
- Maintain control without repeated touch-downs.
- Perform the exercise without excessive hand support.
- Keep pain at an acceptable level.
- Avoid increased swelling afterward.
- Maintain reasonable foot, knee, and hip alignment.
- Perform both the beginning and end of the set with similar quality.
Only change one variable at a time when possible.
For example:
- Increase reach distance.
- Add arm movement.
- Add head movement.
- Increase movement speed.
- Change the surface.
- Add an external task.
- Introduce hopping.
Changing several variables simultaneously can make it difficult to identify why technique deteriorated.
For people returning to demanding sport, standing balance alone is not enough.
A rehabilitation professional may also examine strength, hopping performance, multidirectional balance, agility, symptoms, confidence, and sport-specific movement before recommending unrestricted return.
Common Mistakes That Reduce the Value of Balance Training
Making an exercise harder is not always the same as making it better.
One common mistake is progressing to unstable surfaces too early.
A person may wobble dramatically on a balance device without demonstrating useful control.
Another mistake is practicing only static balance.
Avoid these common problems:
- Gripping the floor continuously with the toes.
- Locking the knee rigidly.
- Allowing uncontrolled knee collapse.
- Leaning the trunk excessively.
- Progressing despite increasing pain.
- Using difficult equipment before mastering the basics.
- Performing only eyes-closed balance.
- Ignoring calf and lower-limb strength.
- Progressing directly from standing to aggressive hopping.
- Comparing the two legs without considering previous injuries or individual differences.
Another important mistake is treating balance training as an isolated ankle exercise.
The hip and trunk help control the position of the entire lower limb.
Weakness or poor movement coordination proximally may therefore influence single-leg performance.
A comprehensive ankle program may also include:
- Calf strengthening.
- Ankle inversion and eversion strengthening when appropriate.
- Dorsiflexor strengthening.
- Foot intrinsic muscle exercises.
- Hip strengthening.
- Functional squatting and stepping.
- Walking or running progression according to the person’s goals.
Conclusion
A single-leg stability progression routine for ankle health should move gradually from basic weight acceptance and static balance toward reaching, strength, sensory challenges, reactive tasks, and eventually hopping or sport-specific movements when appropriate.
The best progression is not the hardest exercise available; it is the next exercise the person can perform safely, with good movement quality and without an unacceptable increase in symptoms.
Frequently Asked Questions
How long should I be able to stand on one leg?
There is no single time target that determines whether an ankle is healthy.
Holding approximately 20–40 seconds can be a practical training goal for basic balance, but movement quality, symptoms, age, previous injury, and task difficulty also matter.
Once a basic hold becomes easy, adding controlled movement is often more useful than simply trying to stand for several minutes.
Should I practice single-leg balance every day?
Short balance sessions can often be performed frequently when they do not aggravate symptoms.
However, harder strengthening, hopping, or reactive exercises may require more recovery.
Training frequency should match the difficulty of the exercise and your individual condition.
Is standing on one leg enough to strengthen the ankle?
Not usually.
Single-leg stance can challenge postural control and some ankle musculature, but a complete program commonly includes exercises such as heel raises, resisted ankle movements, squats, step exercises, and functional loading.
Should I perform single-leg balance barefoot?
Barefoot balance can be useful because the foot directly contacts the floor, but it is not mandatory.
Stable footwear may be preferable for people who require additional support or when training for activities normally performed in shoes.
Why does my ankle shake when I stand on one leg?
Small corrective movements are normal during balance.
Large or persistent shaking can occur when the task is difficult, particularly with fatigue, weakness, pain, previous injury, or reduced postural control.
It does not by itself identify a specific injury.
Should I close my eyes during single-leg balance?
Eyes-closed balance is an advanced sensory challenge because visual information is removed.
Establish good eyes-open control first and perform eyes-closed exercises only in a safe environment with stable support immediately available.
Is a balance board better than standing on the floor?
Not automatically.
A balance board creates a different and often greater challenge, but firm-ground training remains important because walking, running, landing, and sport usually require controlling the body against relatively stable surfaces.
Can single-leg exercises prevent another ankle sprain?
Balance and neuromuscular exercises are commonly included in programs intended to reduce recurrent ankle problems, particularly after previous sprains.
However, injury risk is influenced by multiple factors, so balance training should be considered one component of a broader prevention or rehabilitation strategy.
What should I do if my ankle hurts during the exercises?
Reduce the difficulty or stop the provoking exercise and reassess the task.
Persistent, sharp, worsening, or unexplained pain—especially following a recent injury—should be evaluated rather than repeatedly trained through.
When should I progress from balance exercises to hopping?
Hopping should generally begin only after weight-bearing, strength, basic single-leg control, and lower-level dynamic tasks are well tolerated.
People returning from a significant ankle injury or preparing for demanding sport may benefit from physical therapy assessment before progressing to higher-level plyometric and change-of-direction exercises.